Connecting SharePoint Site with Site Scoped Integration
Last updated: May 7, 2026
Overview
Numeric connects to Sharepoint as a cloud storage provider to parse values from Excel or PDF files explicitly linked by team members to help automate account reconciliations.
Integration Types
Numeric offers two types of SharePoint integrations:
General
Site-Scoped
This guide provides step by step guidance for Site-Scoped Integrations.
Please inform your Solutions Manager at Numeric if you require a Site-Scoped Integration. Your Solutions Manager must enable a setting in your Workspace on the backend before completing any of the steps below.
If a site-scoped connection is not required, please refer to 📄 Connecting SharePoint/OneDrive to Numeric without Site Scoped Integration (General)for integration steps.
Note: Under either integration types, Numeric is only able to read documents directly linked to the platform. Indexing of files or any file access beyond documents linked directly is not possible.
This video provides a step-by-step guide for the Numeric Admin (accountant using the Workspace), the IT team (Microsoft Admin), and your Solutions Manager at Numeric:
In this guide we will cover connecting the Numeric SharePoint Site Scoped
integration with your Microsoft SharePoint Site.
This will include:
Connecting the integration in Numeric
Using the Microsoft Graph Explorer to grant permissions to our integration
We will be leveraging the Grant the Role by an Admin using the Graph
Explorer tool to complete the integration steps
IT Admin Instructions:
The steps below should be completed by the Microsoft Administrator before the call to connect SharePoint to Numeric.
To ensure a smooth setup process, please follow these steps to retrieve your SharePoint Site and Web IDs before our initial call:
Step 1: Navigate to the Sharepoint Site you would like to connect to Numeric
Navigate to the SharePoint Site.
For example:
https://{prefix-id}.sharepoint.com/sites/{siteName}
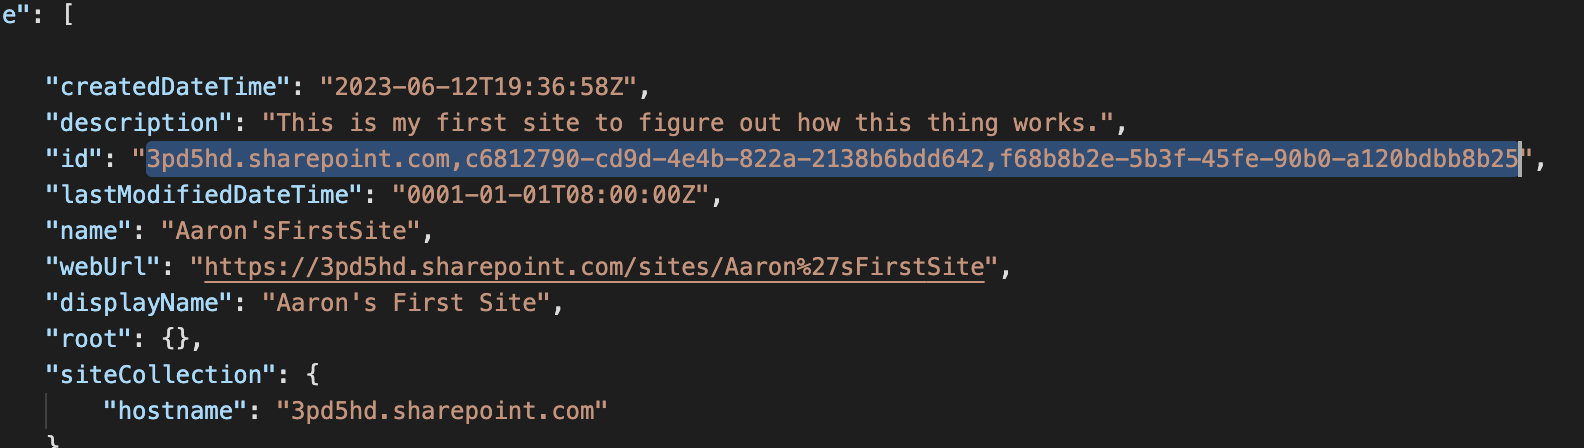
Step 2: Retrieve the Site ID
Open a new tab within the same browser window and navigate to
https://{prefix-id}.sharepoint.com/sites/{siteName}/_api/site/id.You should see a result similar to the provided reference image. The text displayed in white represents the Site ID. Please copy and paste that value into a text editor.

Step 3: Retrieve the Web ID
In a new tab within the same browser window, go to:
https://{prefix-id}.sharepoint.com/sites/{siteName}/_api/web/id.The result should resemble what you observed in Step 2, but the value in the white text will differ. This white text denotes the Web ID. Kindly copy the value and past it into a text editor
Note: Please ensure the text editor file is saved with the Site ID & Web ID. We'll require this data to finalize the integration process.
Connection Instructions (For Numeric Admin & IT admin):
Have Numeric Admin (accountant) share their screen
Connect Integration:
Have the user log in to our app.
Navigate to: Settings → File Storage → Click on 'SharePoint (site scoped)'.
Have user enter their Microsoft login credentials
Note: They will likely be told that they need authorization from an administrator which then provides a log-in opportunity for an Admin
Have the Microsoft admin remote into the users computer and enter in their admin credential
Approve Integration for Organization
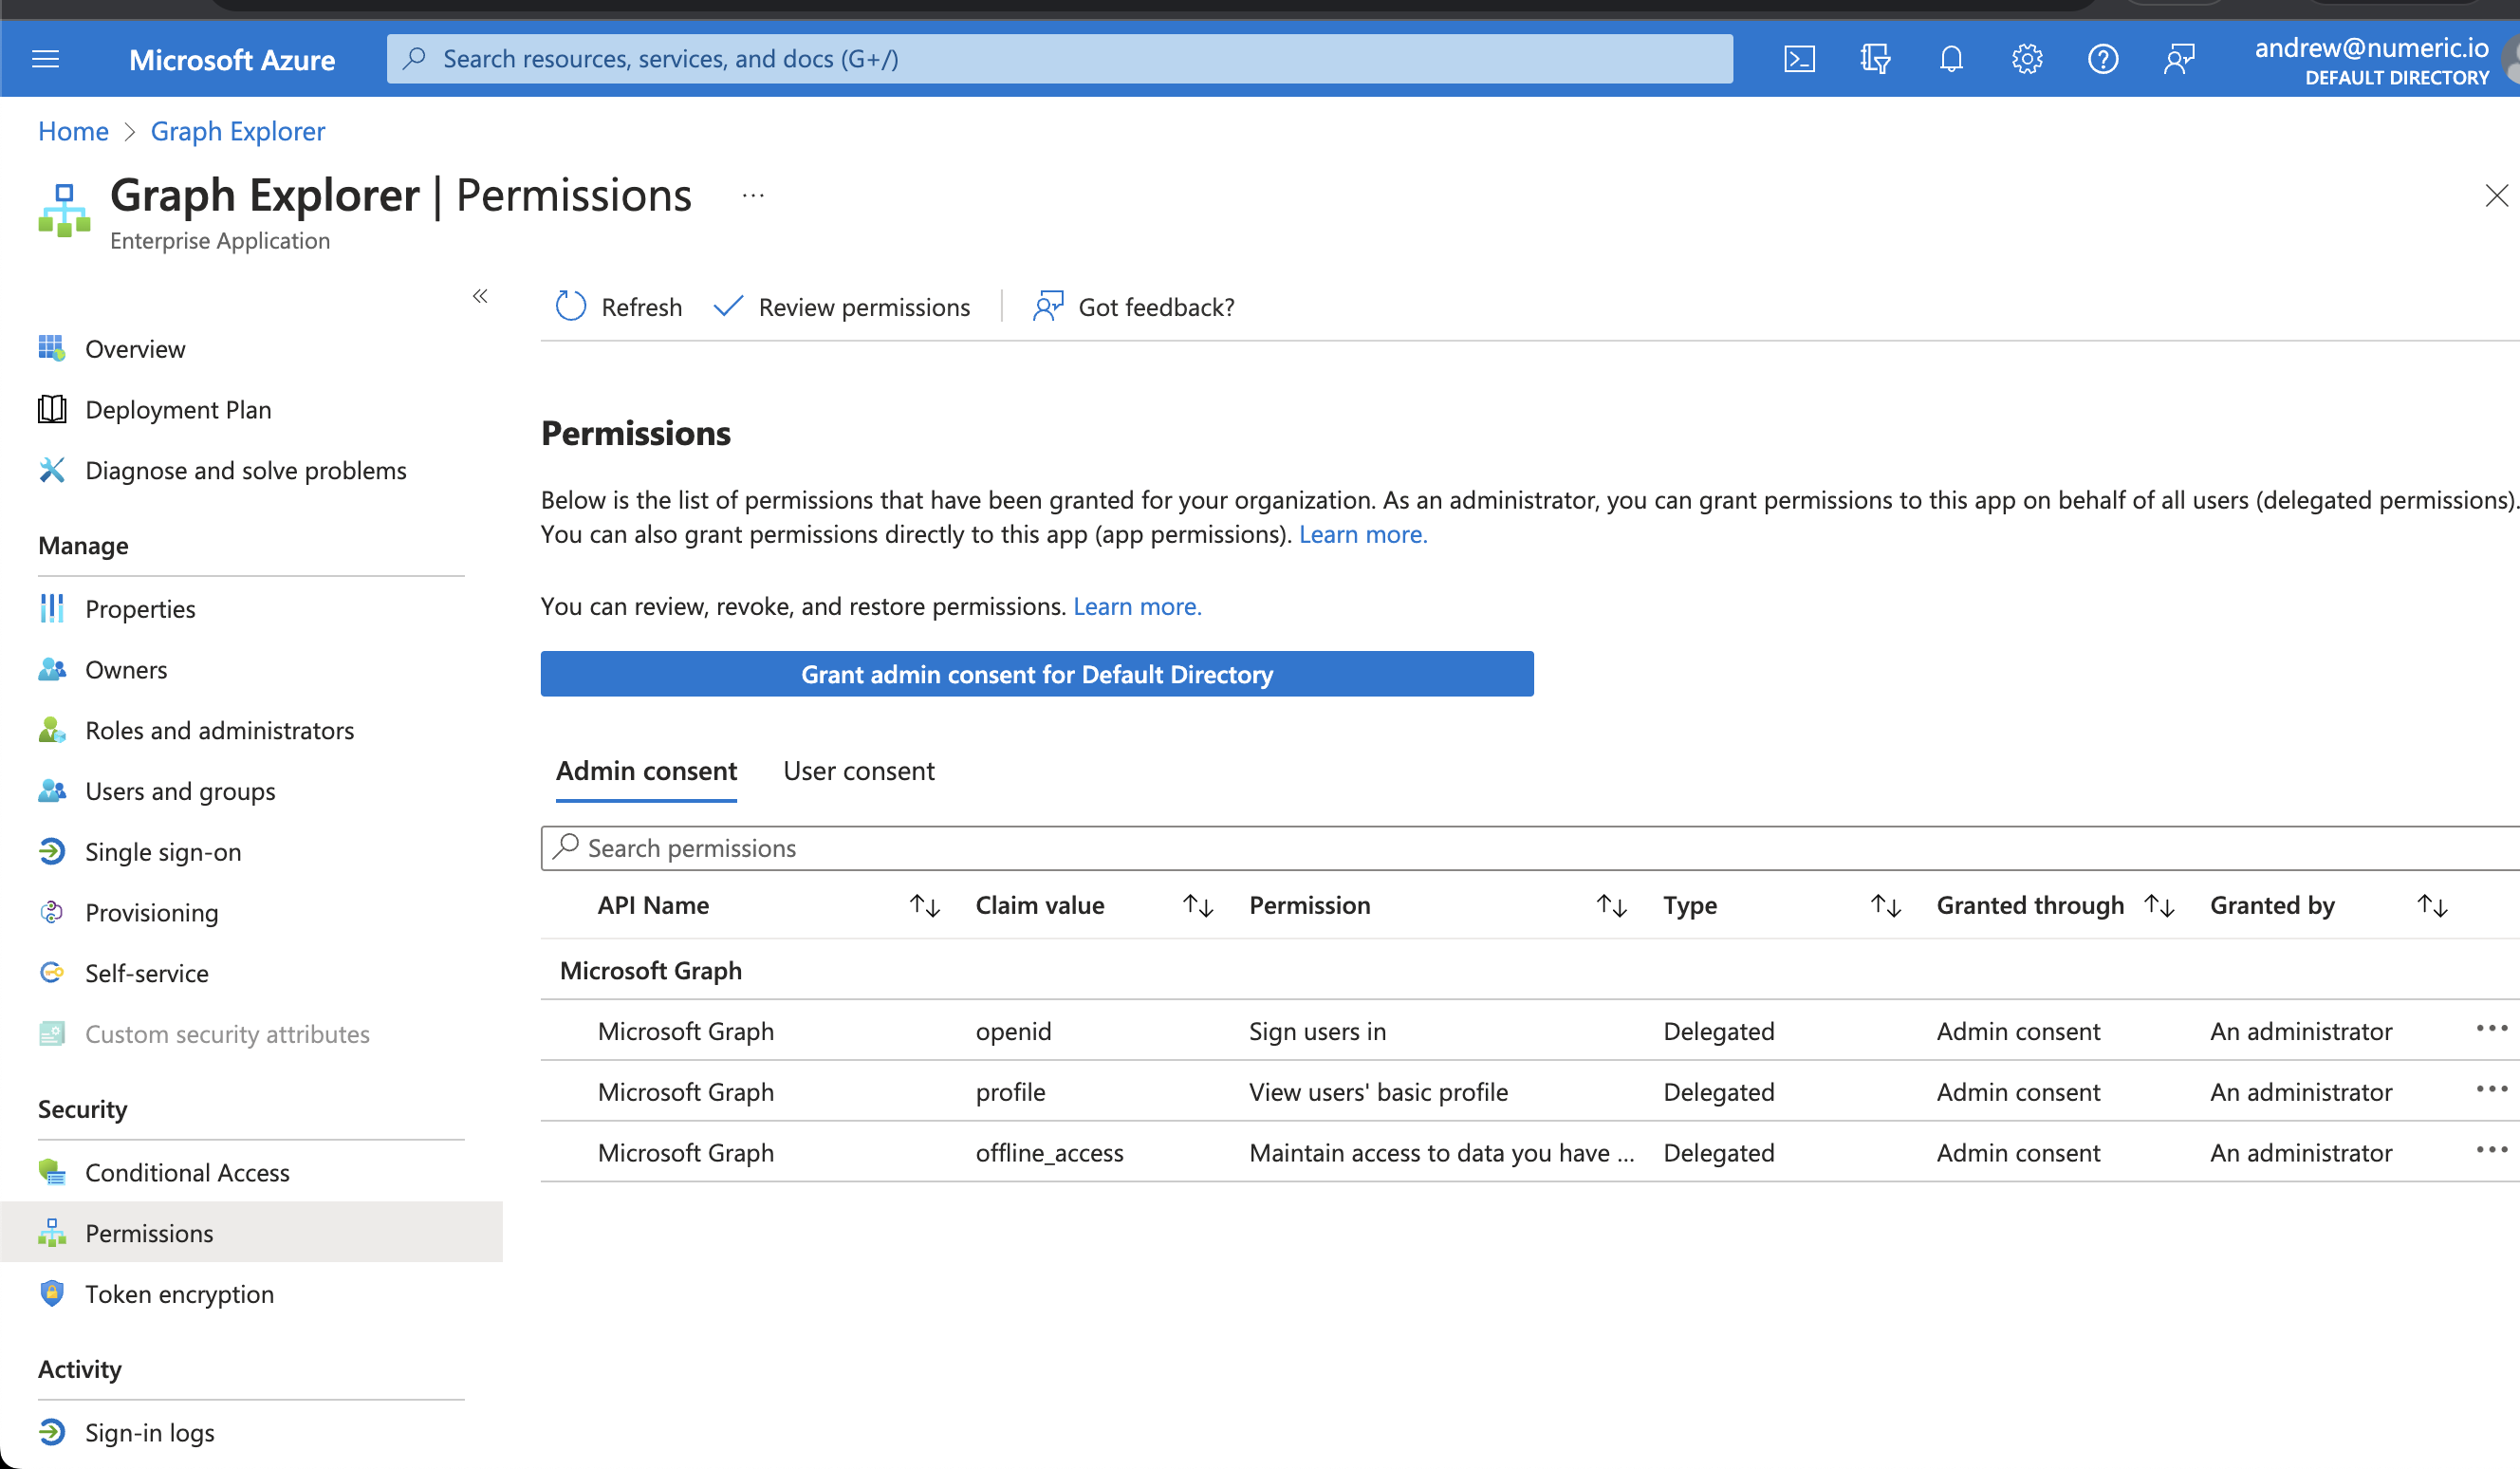
After the initial granting of access by an IT administrator, additional users can be granted access to the Numeric Sharepoint integration via Microsoft's admin portal.
Have the Microsoft Admin share his screen
Navigate to Enterprise Applications in Azure
Select "Numeric"
Within the "Permissions" section you will have the option to grant additional access to the Numeric file storage integration.
Important: After the IT admin completes the SharePoint Site‑Scoped integration, each individual user must also establish their own connection in Numeric. Users should go to Settings → File Storage → SharePoint (site scoped) and sign in with their Microsoft credentials. Until this step is completed, the user's integration status will show “not connected”.
Note: After completing the integration setup, there may be a delay of several minutes to an hour before you can successfully add files or folders from SharePoint. If you encounter errors when attempting to add sources immediately after setup, wait 15-30 minutes and try again. This delay is normal as permissions propagate through Microsoft's systems.

Graph Explorer Access:
(While the Microsoft Admins screen is still being shared)
Direct the Microsoft Admin to the Microsoft Graph Explorer and have them sign in.
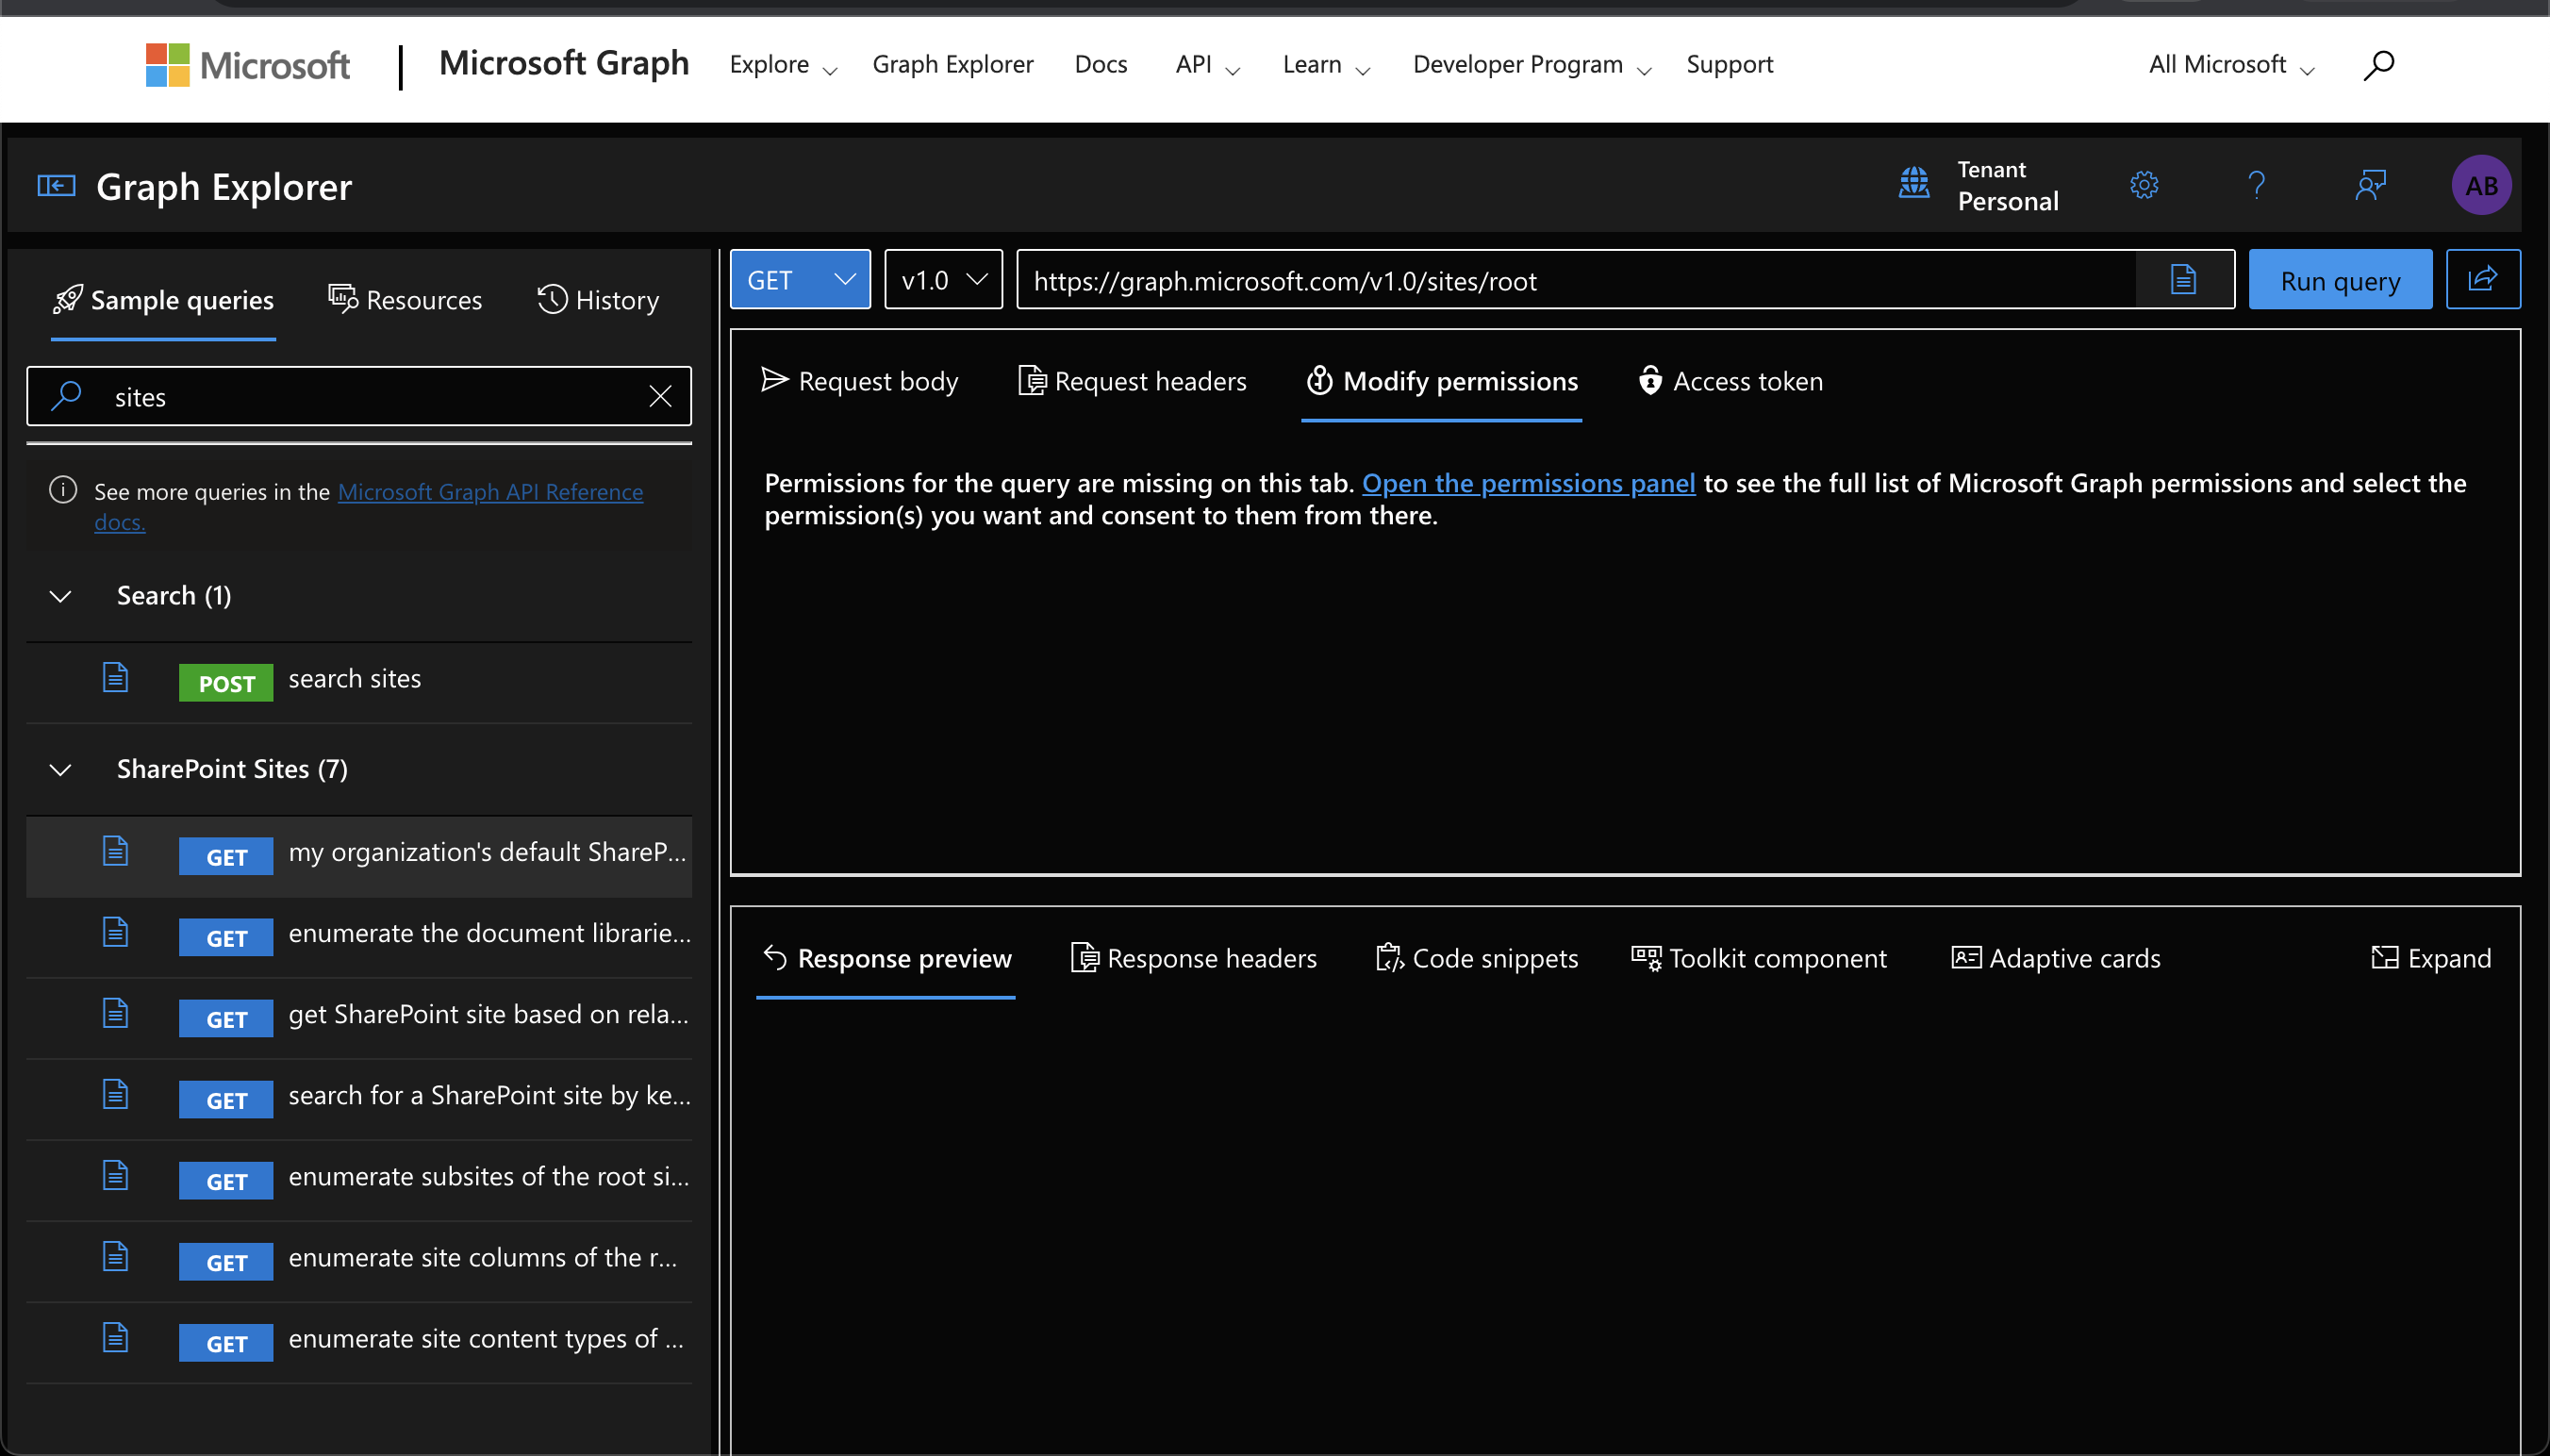
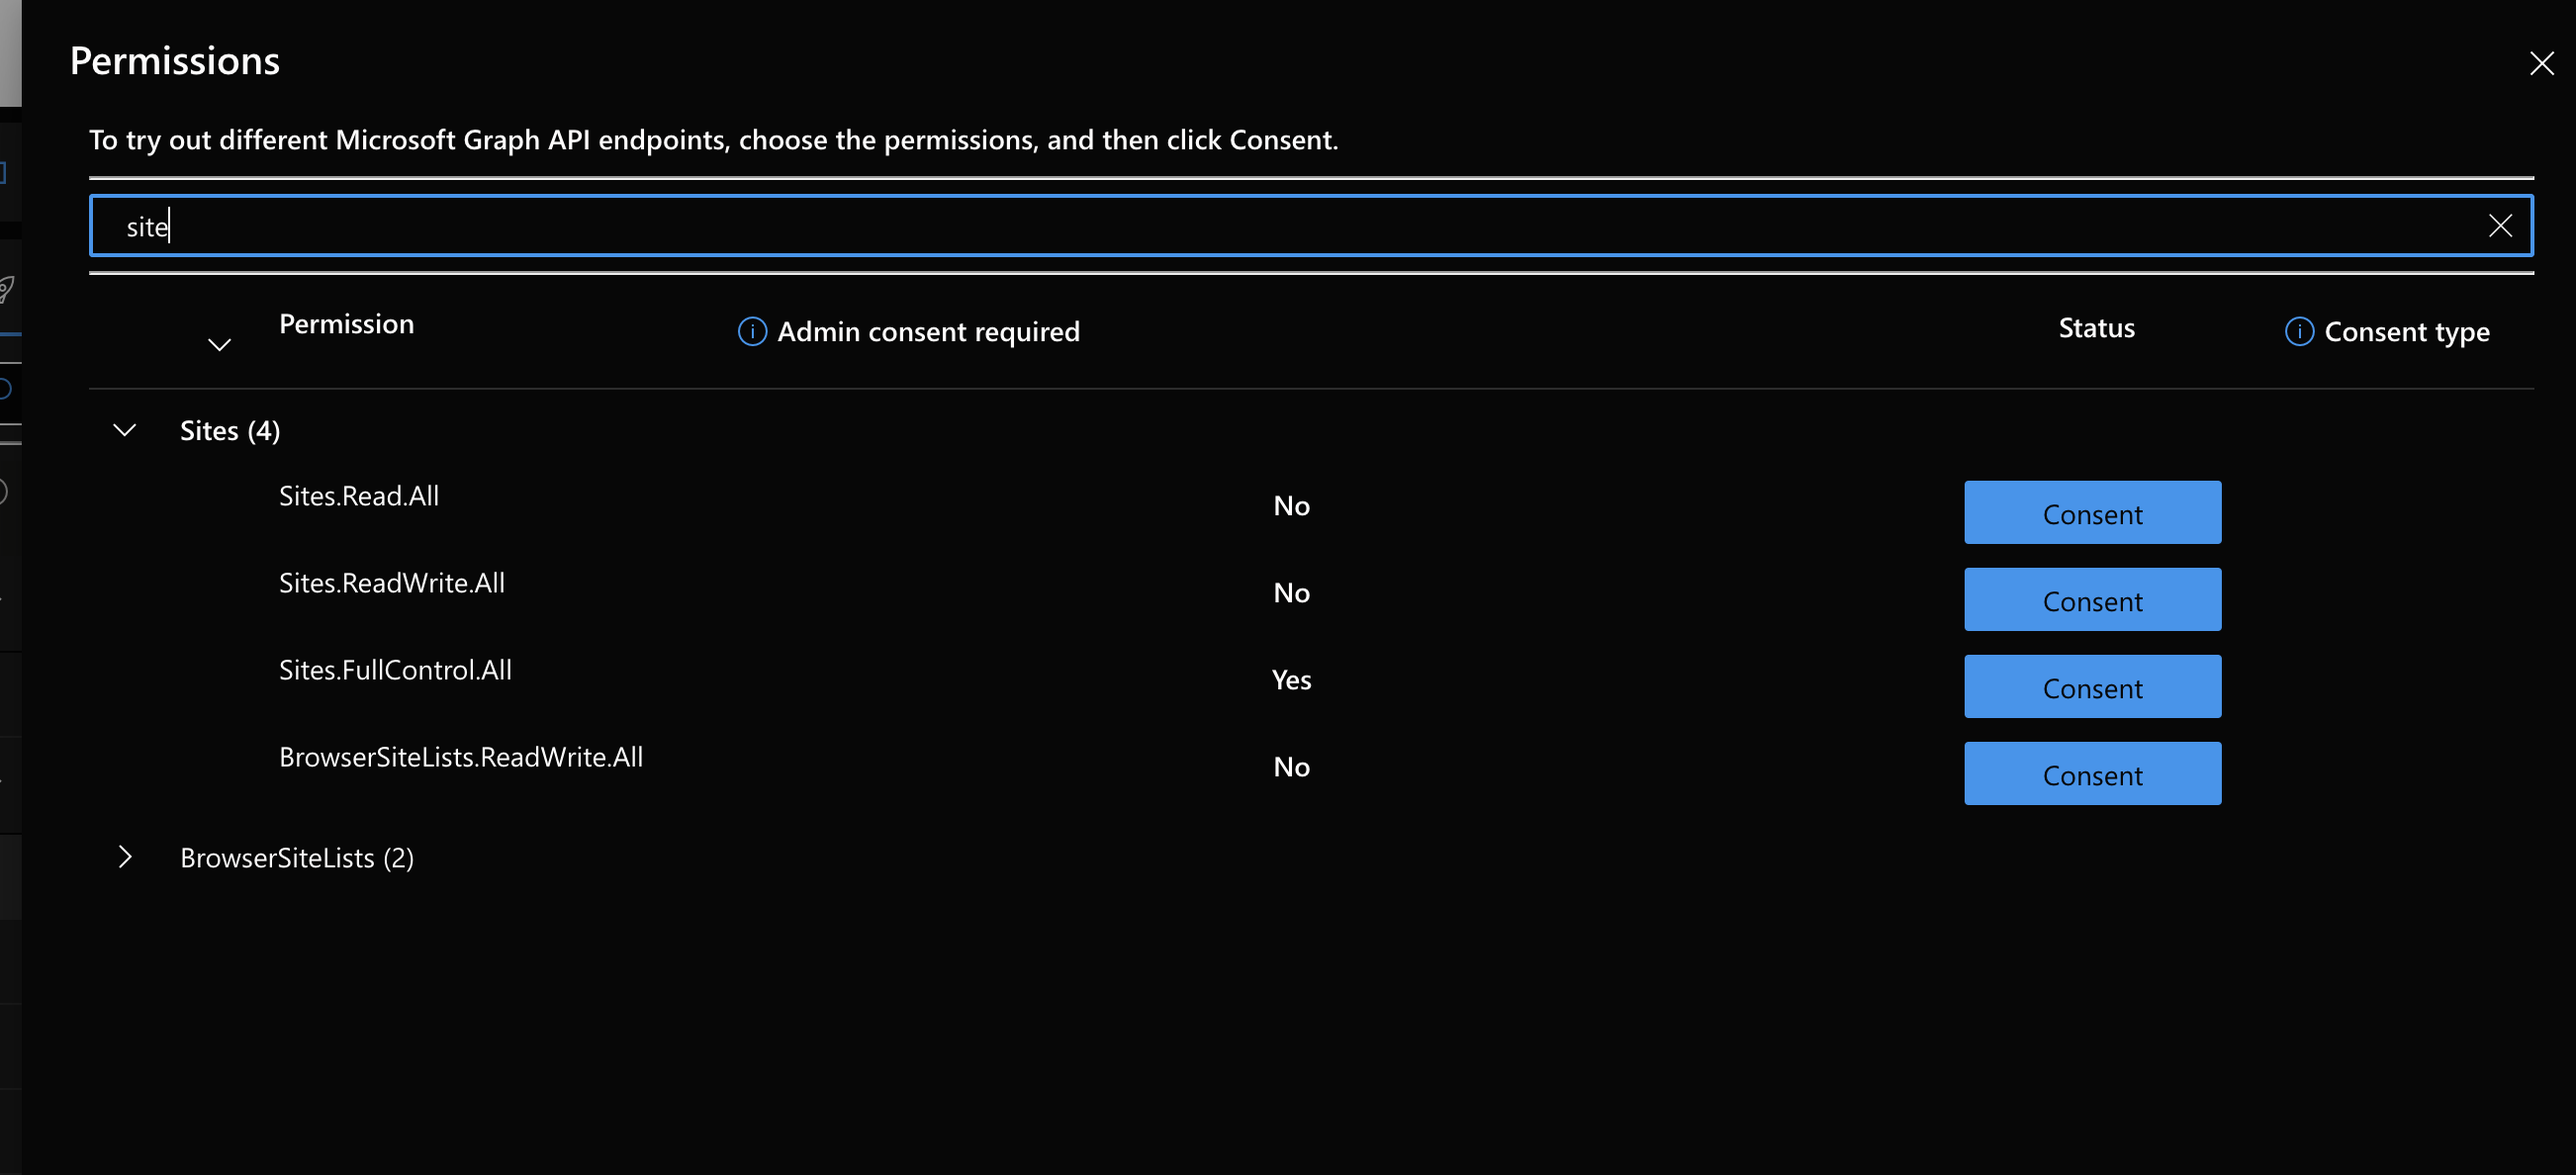
Consent to Necessary Permissions:
Click on the 'Profile' section (top right)
Proceed to 'Consent to permissions'
Consent to both 'Sites.FullControl.All' and 'sites.read.all' permissions.
All permissions will read Unconsent to at the end of the call
Using Graph Explorer (optional):
If the Microsoft admin already got the siteID and WebID before the call, this step can be skipped
Run the following query in the graph explorer
Scroll down the body until you find the site that you are looking to connect to Numeric, locate the site and save the
IDvalue.Note: the ID should have the following format
Connect The Sharepoint Site To Numeric
Run the following query
Replace
{ID}in the following manner: "{prefix-id}.sharepoint.com,{siteID},{webID}"
If the Microsoft Admin got the siteID and Web ID before the call, ask them to send the values in the chat. To format the ID place the values they send you as follows: "{prefix-id}.sharepoint.com,{siteID},{webID}"
Include the exact body text below. The ID here is the Numeric Site Scoped Sharepoint Integration app and should not be changed
{
  "roles": ["read"],
  "grantedToIdentities": [{
    "application": {
      "id": "0c18bd8d-df8c-44c9-8a73-0ec4a01a7e0c",
      "displayName": "Numeric (Site Scoped Integration)"
    }
  }]
}
After clicking the 'Run Query' button, you should see a "200" response body
Revoke Permissions:
Guide the admin to navigate to Azure.
From there, proceed to 'Enterprise Applications'.
Select 'Graph Explorer' and then 'Permissions'.
Find 'Sites.FullControl.All', 'sites.read' and click on the three dots (options) and select 'revoke permissions'.
Revoke permissions after the process.